Saltcorner
By Bob Goemans
By Bob Goemans

After looking at several different brands for a new mini-reef system in my office, decided to try the ‘new’ RSM 130D, as I liked its completeness, - ‘rear’ located vertical sump containing two return flow water pumps, protein skimmer, heater, attachment for connecting a chiller or canister filter, and its hood containing four LED moonlights, two 55W T5 PC’s, and a built-in light controller. The whole system seemed to fit my needs very nicely!
Unpacking
When the RSM ‘aquarium only’ arrived, its necessary to remove some protective foam covering from its box, then lift its hood and remove two long white plastic hinge pins that connects it to the aquarium frame. 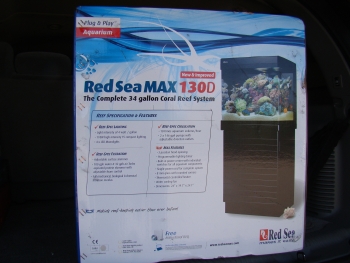 With the hood removed, its then possible to remove two T5 PC lamps, which were securely attached to inside foam liners. With those removed, a cardboard box in the bottom of the aquarium containing its three water pumps, skimmer, printed instructions, a DVD explaining all aspects of the system and its care, electrical power center, cooling fan, and filtering media is removed. With all packing material removed, the aquarium itself, which is glass with curved front corners and weighting 25 kg (55 lbs) can be lifted out. I saved the white foam pad the aquarium was sitting on in the shipping box, painted its edge the same silver color as the aquarium trim (can be seen in the photos), and then put it below the aquarium, which was placed on a custom built stand. This foam pad is an ideal substance/insurance factor to eliminate any unequal pressures a glass tank may develop if placed on a slightly uneven surface or one that may warp with age.
 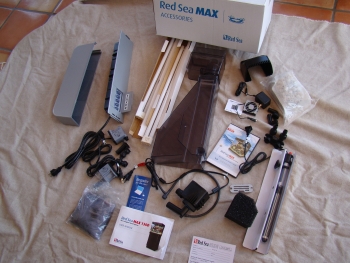 If a RSM stand is also purchased, other supplied items, such as aragonite sand, Red Sea Coral Pro Salt, various additives, etc., come packaged with it.
Water Movement
Before going further, lets take a look at the way water flows through the back located ‘vertical sump.’ – Water leaves the aquarium through an ‘adjustable’ surface overflow skimmer box. After passing downward through a larger sponge filter, it partly flows to the protein skimmer where its processed, then flows into the bottom central area of the sump where it then flows upward and over into a narrow heater compartment and exits at its bottom into the adjacent bio-media chamber. It then flows upward through the bio-media and finally to its two return pumps. A well-designed path for water flow!
Set-up
A leak check was first performed with tap water, and after an hour, it proved to be watertight. Was I now ready for seawater? No, not yet! I decided to use a polyurethane non-toxic ‘foam’ to cover some inside areas to help replicate a natural reef-like wall appearance. 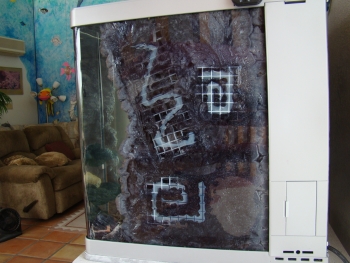 The foam, a product called ‘Handi-Foam,’ was applied to its back wall, most of both side panels ‘and’ its bottom, as this system would have no sandbed. This foam is used on Koi ponds to seal areas between stones/rocks and other joints, and has been used successfully in many aquariums since I wrote about its use in marine aquariums in 2008.
As for the foam, it creates a black lava-like environment, almost identical to some areas found in Hawaiian waters. And since my office is two-story glass it experiences wide temperature changes, therefore the foam coating will provide a more insulated enclosure/more stable water temperature. Additionally, different coral frags can be easily attached/cemented to its surface areas, making the interior look even more realistic. As for the foamed bottom, it’s better looking than a plain glass bottom, at least in my opinion and detritus can easily be siphoned out when necessary. Since the outside view of the side panels were not very pretty, decided to coat their outside surface with a silver water-based paint to take away the view of the eggcrate pieces that were cemented to those inside panel areas to keep the foam in place, as without them, it would peel off and float, as its quite buoyant. 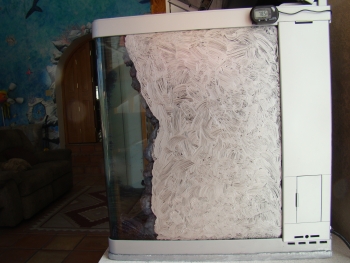 Because of its buoyancy, the overflow was not foam-coated because I did not want the possibility it might cause it to raise somewhat, which then would interfere with the aquarium’s set water level. I’ll just cement some zoanthids to it in the near future to mask it. (Contact me if wanting more info on this foam product or the actual set-up.) (See last photo for how the overflow looks after seven months)
Once foamed it was placed on its custom-made strong stand, as the full and finished aquarium would weigh in at about 230 kg (500 lbs). It’s supplied bio-media (porous ceramic cylinders), were then washed and placed at the bottom of the left rear bio-media chamber. The supplied bag of activated carbon, which is supposed to be placed above it, was skipped in my system because its media would be used in an attached canister filter. Nevertheless, you’ll find it impossible to get your hand past the two return water pumps located above the activated carbon when needing replacement, therefore both pumps will have to be removed when replacing it, then reinstalled.
Its two water pumps, 9W, 550l/h pumps, were then installed in the bio-media chamber by placing their threaded outflow tube through drilled holes and screwing their ‘adjustable’ outflow nozzles onto their outflow tubes. As a minor improvement, I placed a rotating ‘FLO’ nozzle on one of its two outflows. Even though the outflows are adjustable direction-wise, having one that provides ever-changing current directions will benefit all corals in the aquarium.
With the two pumps installed, their electrical cords are neatly placed into a ‘deep’ channel (major improvement) existing along the top trim of the ‘aquarium’ backwall.  This hides those cords from view and allows their plug ends to reappear at the opposite right rear corner and enter the power center area located below. There’s also a water level window on the upper left side of the bio-media chamber that’s quite handy for keeping track of system evaporation. Above this area on the upper back wall I drilled a small hole to allow for RO/DI water to flow into this compartment to makeup for evaporation.
Installing the 150W heater took all of about 30 seconds, as it was placed in the narrow section between the bio-media chamber and the right located protein skimmer section. Its electrical cord also feeds through the same depression and once all three cords are in this channel, there’s a cable channel ‘cover’ that snaps into place making the cords no longer visible.
Installing the skimmer body required its 17W pump outflow nozzle be inserted into an O-ringed receptacle on its lower right side, then placed into the sump where skimmer body guide rails align with sump wall rails. Skimmer body shape allows for the pump’s lower intake to have an affect on bubble dwell time by creating a countercurrent, while its upper outlet with its air connection to the surface, providing an aerated supply of water. Its collection cup, installed after the system hood is reinstalled, has an adjustable skimmer ‘neck’ (major improvement) that allows for height adjustments to the foam column.
The pump’s electrical cord and air tubing, which exit next to the aquariums right rear corner electrical power center opening, has its electrical cord fed through a small plastic groove/channel in the top aquarium frame and then its plug end lowered downward into the power center. The pump air tube, with an adjustable air regulator at its top length, is secured to the pump’s power cord in two places, with its top clip located at the point where the cord exits the water, thereby allowing for easy adjustments to the pump’s air volume. In fact, this top right rear corner area has grooves/channels for all four power cables, as they all end up going through this opening to be plugged into ‘their’ switch-controlled outlet/power center below, with its single power cord exiting via a slot in the bottom right rear corner. 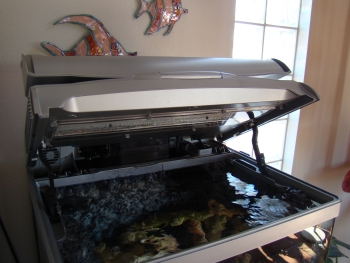 So there’s only one power cord exiting the entire system. Nice touch! All equipment on/off moisture protected switches can be accessed through an external door at the bottom rear right side of the unit. The top entrance to the below power center is covered by the hood when closed. The unit’s lamp timer is in the hood’s upper rear right corner, has a lift up hinged cover plate, with the timer further covered with a removable clear plastic cover to help keep it moisture proof.
Once the skimmer was installed, a large supplied mechanical filtration sponge with an angled corner to prevent any damage to the pumps air tubing is slid into the space between the power center left wall and the right side of the skimmer body. Therefore, all water from the ‘adjustable’ overflow skimmer box (major improvement), which is installed next, is prefiltered before going to the skimmer and remaining sump areas.
With the lamps installed in the hood, it’s a simple matter of attaching it and the other two covers, skimmer panel and timer cover, back to the aquarium frame with the two plastic pins that were removed when the system arrived. 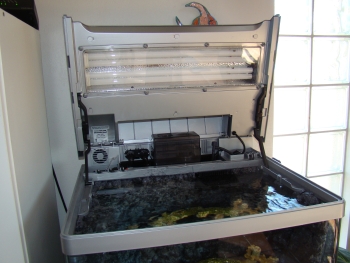 Side hood support legs, which are a part of the aquarium upper side frames, are then connected to the hood. There are three opening angles; the front 30% of the hood can be lifted up and swung back and can lay with its top surface laying flat on the top edge of the remaining hood. Its bottom surface when closed now becomes an upper work surface, as it has four circular receptacles for water test vials, or other items. Nice touch! As for the main hood, it can have a 60% or almost vertical open position (major improvement) for easy access to the aquarium’s interior for general husbandry needs.
With all five electrical cords (lights, 2 water return pumps, skimmer pump, and heater) now dangling downward into the power center area, they are now plugged into their designated outlets and the power center itself is then placed into this opening. The only other remaining item to connect is the supplied cooling fan, and it snaps into a recess in the upper back left corner of the unit. It’s a 7W DC powered unit with a supplied transformer, but has no on/off switch, therefore, once plugged in it’s always on. I may want to put it on a separate timer, but time will tell if it’s needed fulltime because the hood already has two side located muffin fans that are on automatically when the T-5’s are lit.
Accessory Equipment
One of the main reasons I wanted the RSM 130D was its ‘accessory’ bracket (major improvement) for the hookup of a chiller or canister filter. The bracket, having two bayoneted hose barb connectors, snaps into a cutout on the upper backwall rear frame. In my setup, a Fluval 205 ‘and’ TECO SeaChill TR5 were hooked up in a continuous loop with aquarium water first gravity flowing to the chiller via one barbed fitting, then feeding directly from the chiller’s outflow port to the inlet side of the canister filter, where its pump returns it to the aquarium through the second barbed fitting. That way, I didn’t need a dedicated pump for the chiller. With the Fluval pumping about 100 - 150 GPH, there’s sufficient flow being pulled through the Chiller, as per the TECO technical staff. If no accessory equipment is used, Red Sea provides a plate that can be snapped into the opening to close off this access area. 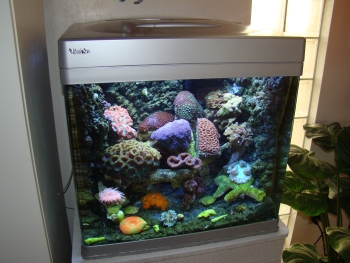
Once everything was operating, the words ‘plug and play’ came to mind, which fits the new RSM to a ‘T.’ And must add, the new RSM walks its talk, and also has a 12 month warranty! And it’s a totally quite unit, making it ideal for the bedroom if so desired. An excellent unit! If there are any improvements I would like to see in future models, it would be a ‘sun-set and sun-rise’ photoperiod where the lamps can be set to go on or off one at a time instead of both on or off at the same time. And if you’re wondering about fishes in this system, I have on order 10 Sexy shrimp, as a past office aquarium had them multiplying in such great numbers the fishes in that small system rarely had to be fed. 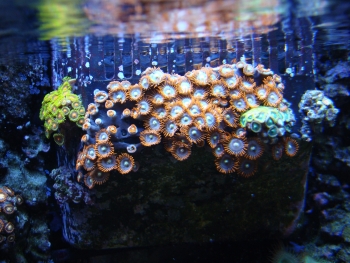 But I’ll let the Sexy shrimp multiply when they arrive, then add some pipefish, possibly a pair of Banggai Cardinalfishes (Pterapongon kauderni). I’m not about to rush to adding fishes, as I want a reef system that’s fully under control with its corals prospering and water quality perfect before adding fishes. 'Patience' is the key to success in this hobby.