Saltcorner
By Bob Goemans
By Bob Goemans

When it comes to aquascaping, whether for freshwater or marine aquariums, there are numerous themes and material choices to bring one’s aquarium interior environment desires to fruition. And over the past few decades, live or artificial rock of one kind or another has been the substrate of choice when it comes to making many aquarium environments look natural, especially those in marine reef aquariums. However, its been my position for at least a couple of decades that too much live rock was unnecessarily being used in many marine aquariums, and/or its placement resulting in what looked like a brick wall covering the entire back of the aquarium. I can fully understand the desire not to allow large portions of the aquarium back panel or its various plumbing, i.e., outlets, overflows and/or water surface agitators, to be overly visible. Without a doubt this distracts from the overall beauty of the aquarium’s interior environment.
Nevertheless, brick wall-like live rock linings of back and possibly side aquarium panels greatly limit the aquarist from being able to clean behind them. And with age, the rock in some environments become encrusted with algae and corals, making it even more difficult or impossible to see the surface areas behind them, not alone clean those areas. And when that happens, water flow between these ‘rocks’ becomes restricted or nil, and once maintenance in any area fails to keep pace with it needs, such stacking of rock can contribute to a decline in water quality since it’s a perfect place for detritus to collect.
To alleviate such conditions I’ve in the past asked hobbyists to use their imagination and try to duplicate nature, not a brick wall. I’ve suggested rock be drilled and tied together with monofilament line, plastic cable ties, or stainless steel wire to form natural looking environments that can ‘securely’ be placed short distances from side panes. I’ve even suggested drilling a hole through several pieces of live rock and inserting a PVC tube or an acrylic bar through the holes to secure them and then placing the shiskebab-like arrangements at angles to side panels. I’ve even explored the use of various underwater epoxies and cyanoacrylate glues to fasten rock together to form overhangs and caves, yet that never did prove to be too successful.
I’ve even given some thought to shaping Styrofoam and coating its surfaces in waterproof materials, yet decided that was beyond my level of expertise and/or the time required to accomplish it properly. Yet, every time I visited a public aquarium and saw their beautiful artificial decorations my brain would wander and begin to think about how to create something similar in my aquaria, yet at far less cost. And when I visited Living Color in Ft. Lauderdale a few years back and saw their beautiful artificial coral inserts, I came away more determined to find a way to create a more natural looking aquarium enclosure. And if interested in artificial ‘coral’ inserts, visit my website and checkout some of their creations in the Gallery area.
Then, as time passed, I began to hear about the use of spray can polyurethane insulation foams, which are used to fill small spaces in construction projects, e.g., those between windows/doors and walls, being used to cover inside aquarium side panels. Sounded interesting, but wondered about the toxicity of these products! Decided to visit some local home improvement stores and lumber yards to checkout the labels on some of these polyurethane insulation products. Even though there were many choices, with some having greater expansion rates than others, I was still not overly impressed with the words ‘non-toxic’ written into their fine print. Nor was I willing to search out their individual chemical safety records (MSDS – Material Safety Data Sheets). And besides, their color, mostly tan/brown was unappealing!
During this timeframe, while searching the Web, I became aware of two products, Great Stuff by DOW, and a product called Spraydekor, already being used by some aquarists, but was unable to find any clear-cut results or long-term use comments about them anywhere on the web! That alone made me feel somewhat uncomfortable about the use of these products, as usually the web is filled with comments one way or the other. Yet, from what I could gather, these products were simply spayed on flat laying side panels one at a time where the product would expand, and depending upon just how much was applied in places, a lumpy-looking covering of foam resulted. Then pieces of dry rock, crushed coral, broken pieces of dried coral branches, and even some sand grains of different sizes could be pushed into this sticky, quick drying foam to produce a more natural looking background. In fact, it was said the material could used to form caves and archways outside the aquarium, then moved to the aquarium interior and cemented in place.
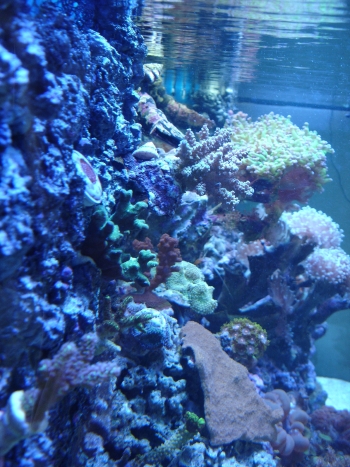
While considering testing one of these polyurethane insulation foams on a small nano tank, I walked into a local aquarium shop, Southwest Saltwater, a while back and ‘presto’ there was a new 240 gallon reef aquarium in the rear of the shop sporting a ‘foamed’ interior! Wow, it really looked great as its rear panel was covered in a ‘black’ lumpy-looking mass of foam with coral frags inserted in various areas. The color was perfect, as it did not distract from other interior aspects and simply blended in with the overall environment. Unfortunately, the shop owner was not there that day, and I was unable to get any information on what product was used and/or how it was applied.

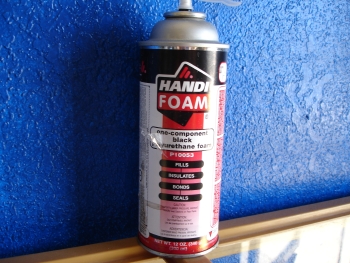
A few weeks later, I again visited the shop and was able to chat with the owner Rob Inman and he explained that he was using a product called ‘Handi Foam,’ which is an expanding polyurethane pond product used to build waterfalls in Koi ponds or seal gaps or spaces between their rocks. It adheres to all surfaces except Teflone, silicone and polyethylene and expands 2 to 3 times the extruded bead size, making it simple to windup with a lumpy looking, almost natural black lava-like appearance by controlling the amount applied in various areas. And best of all, its ‘really’ non-toxic as the animals in his system, seen in the attached photos, are thriving.
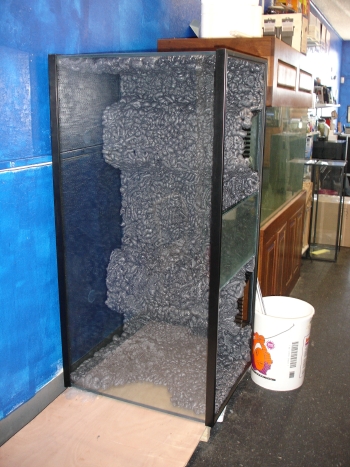
As things go, he had a new 125 gallon in the shop that he just finished foaming its back and two side panels and was awaiting delivery to a customer. Rob went on the say that if one were not happy with the looks of the finished foam covering, it could simply be pealed off with no damage to the under lying surface, whether that be glass or acrylic. And that one panel needs to be foamed while laying flat, then given an hour to dry, then move on to another side panel laying flat, if so desired. He also noted that if one did not want the product applied directly to his or her aquarium panels, it could be applied to a sheet of plastic/acrylic and it inserted to possibly an already existing aquarium! Or, caves and arches made outside the aquarium that contained weights, such as pieces of rock, embedded in the foam and then placed in the aquarium as desired. This lends many possibilities to what can be formed outside the aquarium, and how one’s aquarium environment can be ‘molded’ to fit certain animal species! He also noted the product is inexpensive, and one 12 oz spray container can cover an area of about one square yard. In fact, a ½ inch bead of the product, which swells to about three times that size, can be had for 440 feet before the container becomes empty! And there’s a larger size available, a 31 oz size, with all costing about a dollar an ounce.
Yet, there was one situation with its application that needed some forethought, and that was the resulting foam covering was very ‘buoyant!’ This meant that if you didn’t want it to peal off on its own and float in your aquarium, some live rock should lean up against it in some areas as he has done with the system in his shop. But he now recommends super gluing small pieces of eggcrate to the panels prior to them being foamed. These small pieces, with their flat side cemented to the aquarium side panels in several places is sufficient to keep the foam covering securely in place. Therefore, rock would not have to be leaned against the foam coverings to keep it secure. And ‘yes’ according to Rob it takes a little experimenting as to how much to spray and where to get the look desired, but as with running, one must learn to walk first!
In closing, the home improvement construction type insulation polyurethane foam products are even far less expensive, but don’t have a tract record as to their use in aquaria, whereas the pond products do. So I’m more inclined to go with them. And as one can see from the photos, the final look of the aquarium interior is far improved. I would appreciate feedback from those having experience with these foam products, whether successful or not, as I would like to pass that information on to others who may in the future have questions about their use.
